![]() Introduction
Introduction
Ripping straight from CD with the intention of
getting a simple but high quality duplicate and turning it into MP3 is
a fairly simple process. You place an audio CD in your computer CD drive,
and using either a standalone program like CDex
or a combination of programs, like EAC
and RazorLame, you produce
your compressed digital MP3.
If, however you wish to source from vinyl, tape, multi-track or any analogue
source, you need a little more technical knowledge and a few extra items
of equipment and software.
Daunting as it may seem, it is a relatively simple process and shouldn't
discourage anybody other than the habitual technophobe. Here's what you
need and what you do with them:
Equipment:
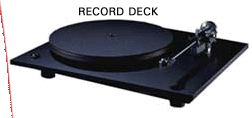
Record Deck - Kinda obvious this, but a reasonable quality Hi-Fi
Turntable and a record is your starting place. Substitute a Tape Deck,
VTR, a Multi-track, Radio, Cartridge Machine if this is your source -
the principle is the same.
Stereo Amplifier - Whilst we are at the analogue stage this is
the heart of your system. You can't plug a Record Deck directly into your
sound card, the signal will not be loud enough - so you must have an amplifier
to boost the signal.
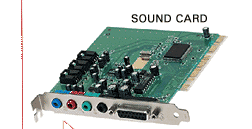
Sound Card - Your analogue signal needs to be fed both in and out
of the computer via the sound card. On modern cards the inputs and outputs
are colour coded as follows:
| Blue | Line-In (We'll be using this one) | |
| Red | Mic-In (This is rarely used for anything of a Hi-Fi nature) | |
| Green | Line-Out or Speakers (We'll be using this one too) It goes either to an available input on your amplifier, typically the Aux Input or direct to your desktop speakers. | |
| Other | You may have other coloured inputs and outputs on your sound card, but the ones above are the primary items, so we need not concern ourselves with any other options at this stage. |
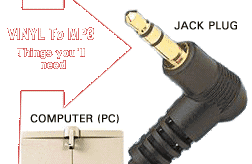
Cables - Unless you have an amplifier made
before the advent of
Glam Rock, you'll almost certainly need two types of cables and plugs:
| RCA Phono
Cables - these paired cables plug into your amplifier from your
source record or tape deck. |
||
| 3.5mm Two
Ring Stereo Jack Plug - You'll need two instances of this single
plug. One from your amp's Tape Output to the Line-In
on your computer. The other from your computer to either your desktop
Speakers of your amplifier's Aux-In. |
||
| Any variant on
this arrangement, then you'll probably have a posh sound card and
you won't need this article to tell you how to dub from analogue sources! |
Computer
- How could I forget? Yes you'll need one of these also, to process the
resulting digital Waveform or WAV file. I should point out that
this article is aimed at PC owners, with apologies to Mac owners.
The principle is the same but the connections and software will be different.
Software - Please see the panel opposite for a description of the
software required for the two main approaches to processing your analogue
music once it gets to your computer.
![]()
Method:
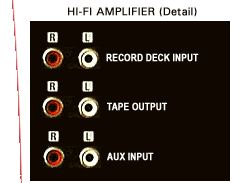
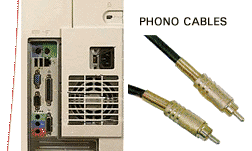
1. Plug the Record Deck into the appropriate
Input on your amp - commonly referred to as the Record or Phono Input,
usually with RCA Phono Cables like those illustrated above
right.
2. Next, plug another set of RCA Phonos from the amplifier's
Tape Output connectors to the Line-In on your Sound Card
with a Stereo 3.5mm Jack Plug (illustrated above right).
3. Plug a final set of Phono to Jack cables from your PC's Line-Out to the Aux-In on your amplifier, or output to your desktop speakers.
4. Crank up your PC, and test all connections with a
sample record on your deck - Most software will let you monitor the signal
coming from your PC Line-In, without actually recording the signal.
Adjust the incoming level with the built in Windows Mixer (normally available
from the System Tray in the bottom right of Windows screen)
or better.
5. Using your selected software (options detailed in panel right)
record the signal from the Line-In.
6. Carry out the clean-up process and filtering appropriate to
your chosen software. You should end up with with a WAV File. This
will be large, anywhere between 15 to 70MB depending on the length of
the track. You can delete it after the next stage (7).
7. Then fire up your MP3 encoding software, find the WAV File on your Hard Drive and encode. This last part of the operation should be quite simple and familiar, as it's not that different from normal CD ripping. The source is a WAV file, rather than a CD.
8. And that's about it, playback your MP3 file. Its
quality will be dependent on how good your Record, Record Deck, Amplifier,
Sound Card and software are. Good results can be achieved. Any questions,
don't hesitate to contact me at the usual address.
|
 |
|
 |
|
 |
|
 |
|
 |
|
 |
|
Software Options for Processing |
 |
Full blown Wave Editors come with a whole host of tools for processing digital sound like: Noise Reduction, Comp-ression and Equalization. These are primarily aimed at musicians and profess-ionals and can be quite complicated and expensive. However, if you want total control over your analogue rips, then a wave editor is the package to go for. Major programs include: Wavelab, Sound Forge and Cool Edit. The industry standard, Sonic Foundry's Sound Forge is my favourite of these. Demos of these programs are available from the software companies web sites - so investigate if you want to go down this route. Dedicated Stand Alone Solutions If all you want is a simple wave processor there are a few dedicated programs that will record your analogue source and produce a reasonably good Wav File. Different levels of sophistication exist within each program, but none are difficult to use: LP Recorder - Once you've plugged everything as the instructions detailed in the Method (left), LP Recorder will take your input, and produce a WAV file. You adjust the input levels and that's it - a no frills solution. Groove Mechanic - A better solution is Groove Mechanic, which will analyze your recording, and then process out the scratches, turntable rumble and hiss, in degrees set by you. I've used this and recommend it. Wave Corrector A nice GUI interface, this program also has some neat algorithms for getting rid of unwanted noise and interference, plus it allows fine tuning if you want it If you're erring on the side of these dedicated programs, then it's worth trying them all to find which one suits best. |