
The crafting of wooden arrows for the longbow is a subjective topic. These ideas set out in this article are mine, and you are welcome to try those you find attractive, and I hope you find them helpful. Equally you may dismiss any you consider unhelpful. There are alternative methods available, they are probably equally valid, but I can only write about those techniques I've tried and found appropriate.
This piece will begin by sketching out a little theory, without which I think one cannot make a useful arrow. I will then discuss the thorny question of what wood to use, cover the question of shafts, then nocks, points, and finally fletchings. I am not qualified to cover the subject of how to find lost or buried strays.
Fair warning! Most of the methods I shall describe were developed and practiced by me when I was a single man living in a rented flat. Now I am married and own a pleasant house I would never heat piles over the gas cooker, nor work in the kitchen sink, nor use kitchen implements as tools. Now I have real responsibilities I pay more attention to the fact that certain glues give off cyanide when heated, and gasses build up behind red hot points, turning them into potential bullets. You will of course do exactly what you want.
Any discussion concerning longbow arrows must begin with the archer's paradox. The essence of it is thus. You draw your bow and sight the point of the arrow onto the target. For that moment that you aim, imagine the line of the arrow shaft from nock to point. If you extend that imaginary line forwards you will go past the left of the target (assuming that you are right eyed). Longbows are not centre shot bows, you lay the shaft against the bow, and the arrow flies around the bow. That is the essence of the archer's paradox, that the arrow begins by pointing off to the side but flies straight ahead.
The following diagram seeks to illustrate how this happens.
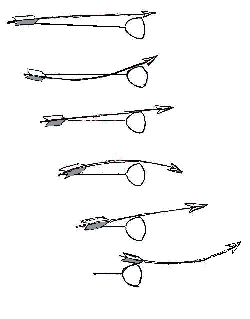 |
The diagram shows a through section
of the bow, an exaggerated view of the behaviour of the arrow, and
represents the string with a horizontal line. The archer is right eyed. 1. The arrow is nocked. It lies against the bow, at full draw, and although the archer is aiming forwards, the arrow points to the left. 2. At the loose the bow begins to straighten, and the kinetic energy which propels the arrow is introduced to the shaft by the movement of the string towards the belly of the bow. The arrow flexes, 3. ...then straightens, before |
4. ...flexing the other way,
5 & 6. and thus clears the bow. This process takes a matter of about 25 milliseconds. The arrow stops bending in 'flexural oscillations' as it flies towards the target, and will follow the line of the string, ie. forwards rather than to the side.
In order for the arrow to flex around the bow shaft as it is loosed there must be a precise degree of flexibility. If this is not the case the arrow will clatter against the bow, it will 'fish-tail' in flight, and it will certainly not behave in a responsible manner. This property is known as the spinage of the arrow. [Back to top]
'Steles be made of divers woods: as,
| Brazil | Turkey wood | Fustic | Sugar-chest | Hardbeam |
| Birch | Ash | Oak | Service-tree | Alder |
| Blackthorn | Beech | Elder | Asp | Sallow' |
Toxophilus Book II, Ascham
Ascham suggest that aspen served for common usage, whilst ash was used in war; he recommends birch, hardbeam, some oak and some ash. The Mary Rose arrows were made of poplar. Today birch is considered by many as unreliable. Ramin has much to recommend it, and I know is used successfully by many, but the wood of choice now is Port Orford Cedar, Little Owls withstanding. It is also possible nowadays to get laminate pine arrows which promise consistent spinage, and I met one chap who used nothing more sophisticated than simple pine dowels from a DIY warehouse.
The important thing is to ensure that the wood is seasoned to prevent warping, and that it is straight grained, and 'be made as the grain lieth'.
If you are a novice your best bet is to rely on a decent supplier (those which I know are listed on the next page) and see what you like best. If you are more experienced you've no doubt formed your own ideas about what works and what doesn't. Although I've never tried working from cut timber there is a piece on another site which describes the method; again see the following page. [Back to top]
I'll assume that you are starting with a square section of timber and go through the long process, if you've just had a dozen machined POC shafts delivered skip this first bit.
To begin you'll need to know what length of arrow you'll need. Take your bow, and either a yard-rule or a length of string, and a friend. Hold your unstrung bow as if shooting, then lay the ruler to it. Draw one end to your anchor point, and then measure to the far side of your knuckle. Add some for the pile (see below), and take some off if you are not using self nocks. I'm 5'8" tall and my target arrows come up at 32 1/2" from nock to point of pile: they are self nocked, the piles are 1 3/4" parallel fit, and I anchor on my eye tooth. Make your arrows a little over and you'll be fine.
The diameter of the shaft will depend on what spinage you want, and whether you intend to barrel them, but please note if you are using commercially made points you will probably be working to 1/4", 5/16", 7/32", or 11/32", and if you've a bought fletching gig that will act as a constraint to the other end.
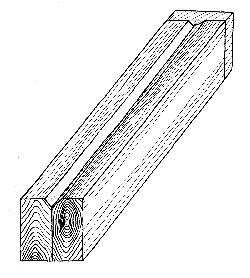
So lets assume you have a square section
billet, well seasoned, with continuous even grain along its length, cut to
the right length. You now need a shuting board.
This is simply two blocks with a corner planed off to make a channel into which will sit the billet to be worked. A block makes it easy to plane. Your channel needs to be about 1/4" deep: if you want to barrel your shafts you'll also need a wedge to insert to lift the end of the shaft.
An aside: at a craft fair I saw a man making cane fishing rods, using a tapered shuting board about 4' long. I've not thought of using a taper before, any thoughts, anyone?
To turn your wood into a cylinder is straightforward: simply plane off a corner, turn the billet a quarter then take off the next corner until you have 8 corners, then 16, and so on. Take off less rather than more and check the diameter frequently. It may be worth cutting one end of the shaft to fit the pile to provide a witness diameter to work towards, although I don't. When you nearly have a round section wrap the shaft with fine sandpaper (or shark's skin if you're keen) and sand to finish. Don't worry if the section isn't a true round, imperfections within the wood will effect the flight of the arrow far more than having a slightly ellipsoid section. To produce a barreled shaft simply plane a fatter near round, then elevate one end with an insert, and plane that to a round, and do the same to the other end. To produce the perfectly matched spine take the shaft and measure it on a spinage gig as you work on it, and don't reduce the waist of the barrel any further after the ideal degree of flex has been measured. (This will make more sense after the discussion on spinage below).
A Diversion into the Question of Barrelling.
The Mary Rose arrows thinned to the nock from 1/3 from the pile, and also thinned to the pile, giving a profile like a fat fountain pen, if you like. Many reenactors like to barrel shafts in the pursuit of authenticity, but, unless you shoot a very heavy bow with arrows as thick as your thumb, it shouldn't be necessary to shape the shaft in order for it to fly well. I'd be interested to hear from anyone with experience of the benefits (or otherwise) of barrelled shafts. C. D. Reid, who wrote a very useful pamphlet 'Making Wooden Self Arrows for use with Long Bows' states that weight for weight barrelled arrows are stiffer than parallel shafts. [Back to top]
Whether you have a commercially prepared or a hand shaped shaft you will note, by sighting down its length, that it will be slightly bent. Always make the straightest section the nock end, that way by cutting the shaft to length you will make it straighter, and the crucial point at which the energy of the bow is transmitted to the arrow is most in line with your aim.
You have two options concerning nocks, either buy plastic ones or cut a slot. Plastic ones are available from archery suppliers (see following page), and are glued on to a taper (cut by an expensive pencil sharpener). Self nocks are much more interesting, never fall off, and, against the evidence of many films I've seen, were used by archers throughout history.
Because the repeated shock of loosing an arrow is potentially quite damaging it is worth trying to protect the shaft from the string. There are broadly two methods. The first is to glue a strip of leather into the neck of the nock to act as a sort of shock absorber. I've not tried this myself nor seen it done. The second option is to insert a piece of harder material (horn or a hard wood) to reinforce the shaft. The Mary Rose arrows used slivers of horn, Ascham recommends Brazil or Holly, but any hard wood would suit; I have seen even formica used!
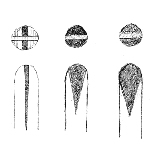 |
Different types of inserts. |
The principle is to cut a slot with the grain and insert a matching piece which should be glued with something like cacsamite. Then sand down the shaft for a good finish.
To cut the nock you need a junior hacksaw and a keyhole file. You don't need a deep slot, just enough to grip the string is sufficient, and it certainly isn't necessary to cut keyhole shaped nocks in imitation of a popular brand of plastic nocks. I test mine with an old length of served string stretched taught: when the shaft will stay on the string without falling off its okay, to check it isn't too tight tap the string sharply with the side of your index finger, as though you were remonstrating with someone, and the arrow should come off the string. The nock on the arrow in front of me is fairly deep at 3/16".
To cut your nock secure the shaft in a vice, and mark a line across the grain. Cut a slot about the depth of the junior hacksaw blade, then open it up with the file. Check for fit constantly as you work. Then round the end with sandpaper so it's fairly pointy, and slightly burn it (not of course using the family cooker ring) to harden the end. (If you are going to use a fletching gig you'll need to check the nock will fit before you burn it!) Then whip the end with thread about 5/16 - 3/8" in to prevent splitting along the grain. Using this method you'll find that wear and tear will destroy your arrow long before the nock gives out. [Back to top]
We now turn to the other end of the shaft. There is a wide range of points available to the longbowman or woman, made of brass or steel, machined or hand forged, based on historical models or modern target usage. For the purpose of this piece we are only concerned with weight and method of fixing to the shaft, but you should consider damage to the target, and the fact that in Britain it is illegal (not to mention quite dangerous) to shoot with some piles.
Historically points were either tanged or socketed. Tanged arrows have a 'neck' which inserts into the shaft: I have never seen them used, and they seem rare in historical collections (being only about 1 in 10 of those I've seen). Modern socketed heads fall into 2 categories, parallel or taper fit. Taper fit require the use of a taper cutter, which is a precise sort of pencil sharpener, and specific to a given diameter shaft. Their disadvantage is that less wood is inside the point, so they snap easier and because less surface of wood is glued they get left in the target more frequently. Parallel fit piles fit either flush or proud. Proud with a shoulder gives you a reference to when you are at full draw, and allows a more consistent draw length, but are harder to draw from the face of the target. Both types of parallel fit require the diameter of the shaft to be reduced to fit snugly. The method I use is to roll the shaft on a heavy metal block with a large file. This produces a keyed surface for the glue. If you reduce the shaft by cutting away wood you weaken the shaft at the neck of the pile, reduction by compression is stronger as the wood tends to recover and retain its strength.
Whatever choice of pile you make, you need to cut your shafts to the right length, making allowance for that part inside the point, then either cut a taper or compress for a parallel fit, then glue on your pile, checking for a good straight fit.
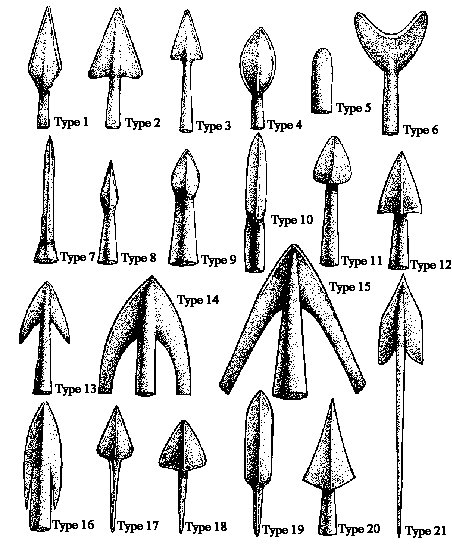
Mediaeval arrowheads: London Museum classification (after Clifford Anscombe in Hardy's Longbow)
Whichever glue you use is a matter of taste and experience. I used to use araldite (a two part epoxy resin) but found that it became brittle and tended to fail if it was very cold. I then switched to hot melt (the stuff you find in glue guns) which is generally better to my mind, although I have found it fail if it gets too hot! [Back to top]
You now have a shaft with pile and nocks, ready for fletching.
The function of the fletches is two-fold; to stabilize the arrow in flight, and to generate a little lift. If the fletchings run parallel with the shaft the arrow will fly straight, if you attach them at a slight angle the arrow will spin. This will make the arrow more accurate in flight, but will also generate drag, which will slow it down and make it more vulnerable to turbulence. In the same way large fletchings generate more lift and are more accurate at short distances, but also generate a lot of drag with the same consequences. As with many things it is a matter of compromise.
Feathers are the best material for fletching. The property of the feather is that it will spring back into shape after passing the bow, and it obviously has good flight characteristics. It is also remarkably resilient. I've dug arrows out of the soil which were coated with mud, and which have cleaned up perfectly. The secret is to steam the fletchings over a kettle spout, the feather almost miraculously will spring back into shape.
Goose feathers are the preferred option, although duck, turkey, swan or peacock are also good. Please note though that flight feathers are used, which on a peacock are brown. Note also to use feathers from the same wing on any arrow, if you're buying buy all left or all right. You can check by feeling the feather, the upper and lower surfaces have a different texture.
If you are cutting fletchings from a feather split the quill with a sharp knife, and leave plenty of that material for the moment. Then shape the feather to your preferred template, and put the fletching into either a fletching jig or a large bulldog clip. You then need to file the quill down (medium sandpaper will do) leaving only a thin strip for gluing. This is also required for commercial pre-shaped fletches.
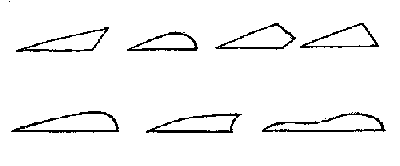 |
| Different profiles of fletching |
To fix your fletchings you really need a jig, or lots of patience and a very good eye. I've done it both ways, and a jig is easier. The jig comprises two parts: the first holds the arrow, nock end, and revolves 120 degrees each turn exactly; the second holds the fletching against the shaft.
As mentioned above you need to pare the fletching down so the feathers sit nearly flush. You need to decide whether to attach them parallel or at a shallow angle (either way they must sit at right angles to the surface of the shaft). You can buy specialized fletching glue, but a commercial contact adhesive will be satisfactory. Alternatively you could try pitch or tallow, or glue made from boiled bluebells (do not dig them up from the wild!). Traditionally the cock feather (that which doesn't lie against the bow) is a distinguishing colour from the two hen feathers.
Now comes the very important part. If the leading point of your fletching isn't finished properly you will inevitably drive it through the fleshy part of your hand between the thumb and first finger. This really hurts. So, with a sharp knife cut the quill into the shaft, you need to cut at an angle of 45 degrees to the shaft, and then with the knife blade still at right angles to the shaft, turn the blade at 45 degrees again to the fletching and cut again. The result is to taper to fletching to the shaft. Now seal that with a big blob of glue.
If you are going for a belt and braces approach you can now whip the fletching on with thread and bind it at either end. You may wish to leave a heel on the end of the fletching if you are doing this. The binding at the leading edge will also protect your hand. I saw a video of a man in Mongolia making arrows who opened up the fletchings by brushing them the wrong way and then spun the shaft with one hand whilst guiding the thread with the other. It took me a little longer. [Back to top]
Finishing.
I used to be sceptical about the historical credibility of cresting arrows (that is painting rings to identify them as your own) until I found a photo of three Roman arrows from Dura-Europos in Syria, which had red and black markings painted on them, (Dixon, K. R. and Southern, P. 1992, the Roman Cavalry, Routledge), so you tell me. It certainly makes it easier to distinguish sets of arrows, and also to pick them out in the rough.
I would always recommend varnishing your arrows. This prevents moisture warping the shaft, helps keep them clean, makes them easier to draw from the face of the target, and adds another layer of adhesion for the fletching. I use yacht varnish for flexibility and durability. I know other archers use bees wax. I guess you pay your money...
Getting the Arrow to Fly True.
This is the tricky bit and brings us back to the introductory comments above.
In order for your arrow to work properly its spinage must match the weight of your bow. If you are just starting out the easiest way to ensure this is to buy a set of arrows from a decent supplier, who will match them to your bow. If you are happy with them you can measure their characteristics and use that information to build your replacement set.
Alternatively build yourself a spinage jig. Support the arrow at either end. Suspend a weight of 1 1/2lb in the middle and measure the deflection in 1/100". That value is the spine measured in GNAS units. I have a set of 50 gram weight arrows which I shoot from my 50lb bow which are spined at 100 GNAS units, ie the shaft bends by an inch in the middle under a 1 1/2lb weight. There is table in the Hardy book which says that those arrows are way too floppy!
My advice is to go with what works for you. The secret is to use a set with consistent spinage. If you are making you own shafts measure them as you work on them. If you are buying order a set to your GNAS standard, then measure them and give any you're not happy with away to less able chums. But remember, spinage is a measure of the stiffness of the arrow, resilience, which is only measured in shooting the arrow, is a measure of the number of oscillations before it straightens out. Beware however, an arrows resilience may not necessarily match its spinage, so be prepared for field trials.
The other factors to get right are weight and balance. Arrows make poor gliders, as the fletchings tend to pull the nose down. The centre of balance of the arrow should be about 1 1/2" to 2 1/2 " forward of the centre of the shaft. Weight is only a critical factor insofar as the set should all have the same weight. A friend took great pains to machine piles to achieve this consistency and it paid him dividends. C.D. Reid recommends target arrows weigh within the range 370 to 415 grains.
Having followed all the above steps, you must now go into the field, shoot your arrows and note the characteristics of each. Extremely errant arrows can be used in the garden to support shrubs. Otherwise learn which goes left of the mark, which drops short, and adjust each shot correspondingly.
It's that easy. [Back to top]
 |
Return to Home page | Some experiments with unusual timbers | |
 |
Why another site on the Longbow? | ||
 |
Links to other sites that might be of interest |  |
A diversion: the Longbow in film, television, and fiction |