
GAU 1
War band infantry (30 figs)
£ 5.20
GAU 2
Heavy infantry (24 figs)
£ 5.20
GAU 3
Gaesatae (30 figs)
£ 5.20
GAU 4
Skirmishers (30 figs
£ 5.20
GAU 5
Slingers (30 figs)
£ 5.20
GAU 6
Archers (24 figs)
£ 5.20
GAU 7
Standards, musicians
£ 5.20
GAUC 1
Heavy cavalry (15 figs)
£ 5.20
GAUC 2
Light cavalry (15 figs)
£ 5.20
GAUC 3
Noble cavalry can be used as cavalry leaders, chieftains, Generals and bodyguard
£ 5.20
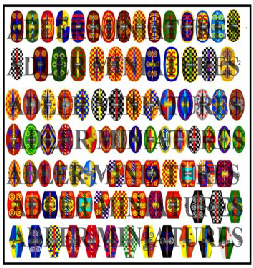
TRANG1
Shield transfers general infantry and light cavalry
£ 5.20
TRANG2
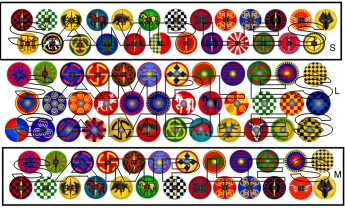
Shield transfers round cavalry
£ 5.20
INSTRUCTIONS FOR TRANSFERS.....
1. Required tools:....Tweezers....Scalpel....Small water container....Kitchen towel/tissue....Brushes reckoned a couple of no 2/3 one needed for decal softener one for moving transfer.....
Micro Set or equivalent ( available from good model shops)....Micro Sol
2. Shields that are to have transfers applied must be paint white and then finished with a gloss finish. This is very important as transfers like a nice smooth surface to which to adhere.
The transfers are not designed to cover shield rims so on any shields that have rims these should be painted first to make life easy..
3. Cut out around the shield shape, cutting out the boss area where required.( this is only needed for round bosses [cut an X across the boss] as the transfers will go over the standard boss/spine type
shields) Don't skimp on blades,....
a sharp blade is needed for accurate cutting. Best method I've found is a rough outline cut then 'chopping' down to trim it to exact size.
4. Lightly coat the shield with some Micro set.
5. Dunk the transfer into the water for about 10 secs, using the tweezers remove from the water.
Dab....on a little kitchen towel to remove access water.
6. Holding the transfer between finger and thumb slide off the backing paper and with the brush pick up the transfer and transfer to the shield.
7. With the transfer in approximate position dab with a little Micro set. Leave for a few minutes.
8. Using the brush move and flatten the transfer into correct position. If its really stubborn use the point of the scalpel to give it a good pull to the correct place.
9. Dab gently with tissue check final position then press more firmly with tissue to settle the transfer in place.
10. You can use a dab of Micro Sol if there's a need.
11. When thoroughly dry coat with varnish. If you have any of the transfer backing visible best to trim this with scalpel after the varnish is dry.
12. Clean your brushes well and use fresh water each time as no doubt Mirco set/transfer adhesive will get into the water.
GLOSSARY
Micro Set is a decal softener/adhesive.
Micro Sol is a more pokey version of the above and should be used with caution.....
1. IS DESIGNED FOR FLAT AND CURVED SCUTUM WITH RIM
2. IS DESIGNED FOR FLAT AND CURVED SCUTUM WITHOUT RIM
3. IS DESIGNED FOR OVAL SCUTUM WITHOUT RIM
4. IS DESIGNED FOR OVAL SCUTUM WITH RIM
5.IS DESIGNED FOR FLAT CUT OFF SCUTUM
6. IS DESIGNED FOR CURVED CUT OFF SCUTUM
7. IS DESIGNED FOR HEXAGONAL SCUTUM
The Gauls are here!
Having been asked to produce Ancients in 1/300th a fair bit over the years we have finally decided to do an Ancient range but to go up to 10mm. Myriad reasons for this but mainly its the extra size means we can depict the armour and dress of the period with greater detail and variations. It also has the benefit of making the weapons more robust.
The first offering is Gaul's to be followed by Caesarian Roman.
GALLIC ARMY PACK
This pack makes up a 1000pt Gallic army consist-
ing of the following:
30 heavy infantry
270 warband infantry
60 Gaesatate
120 light skirmishers
24 heavy cavalry
24 light cavalry
A range of standard bearers and musicians are pro-
vided to provide command groups for the units.
Two sets of infantry shield transfers and a set for
the cavalry are provided
£125.00